A few thoughts on wildlife photography
by Rupert Gibson
I started as a professional photographer back in the pre-digital age shooting corporate sporting events, equestrian and product photography. With the advent of digital photography things have become a whole lot easier but the 1st principles of photography still stand. Over the last few years I have developed a passion for wildlife photography both here in the UK and overseas.

There are numerous books, magazines, blogs and online guides giving useful tips and hints on wildlife photography. There are also 4 or 5 seriously good photographers in this field who share their methods and achievements on YouTube and these people are certainly worth following for sound, measured advice and inspiring images (Morten Hilmer, Steve Perry from Backcountry Gallery and Mark Smith being the best on the web in my opinion).
Getting super sharp images of small birds and mammals present a number of challenges. Firstly it’s getting close enough to them (either physically or by way of camera technology but usually a mixture of the two) to fill the frame as much as possible and, secondly is the technical knowledge to get sharp, well exposed images (N.B: social media images are less quality critical than if you want good sized prints to hang on your wall). My view is to get the best image possible that will achieve both.
The Basics:
Camera Kit:
Good quality camera equipment is a huge part of the process. One can spend an unlimited amount of money on the best camera, the fastest/longest lens and so on. But in reality you need a camera that has fast autofocus whilst capturing 7+ frames per second. The autofocus system is important as small birds move incredibly quickly and the faster your autofocus system can respond to their movement will result in a good number of ‘keepers’.
Lenses:
This can get financially messy! You need the longest lens you can afford – upwards of 300mm and ideally with a reach in excess of 500mm. There are some great lenses available, either prime (fixed at a given length) and zoom lenses which offer a range of focal lengths. Prime lenses are often faster ie: have a wide maximum aperture.
The lens aperture determines how much light is let in and hits the camera sensor. For Wildlife the action is usually fast, so you need quick focusing and to keep the shutter speed high – it is better to have a slightly noisy image that is sharp than vis versa. A wide open aperture lets you work when the light is fading and it also helps to isolate the background from your subject. Zoom lenses (the options for these are huge and all the main camera manufacturers do them such as the Nikon 200–500mm, Sony 200-600mm etc) are very versatile and can help with locating the subject through the viewfinder before zooming in to fill the frame with your subject. Top end super telephoto lenses are hugely expensive and very heavy but they do produce stunning images.
Other Kit:
A good, solid tripod is a must if you are using larger lenses – they are just too heavy to shoot handheld for any length of time. Ideally with some sort of gimbal type head as they make tracking flying birds a whole lot easier, if you are shooting static subject then a normal tripod head will suffice.
Camera Settings:
I am not going to go into detail here on all the options as all this information can be found with a couple of clicks on the web. But perhaps my general settings will be helpful?
The Exposure Triangle:
Shutter speed, exposure and ISO, if one of these variables changes then at least one of the others must change to maintain the correct exposure. Always shoot with your camera set to saving RAW files – whilst these are larger in size then JPEGs they contain much more information, and this gives you much more latitude when editing the images on your computer.
Shutter Speed:
I try to stick to a minimum shutter speed for static birds to the equivalent of double the length of the lens I have on the camera (I.e: 400mm will have a minimum shutter speed of 1/800 sec) this is usually OK for a subject that isn’t moving (it can often be much less and I have had good success with shutter speeds below 1/60 sec with the help of image stabilisation). But for small birds moving around on a branch then it needs to be at least 1/1,000 sec. This shutter speed is often OK for say a Barn Owl in flight but for very small flying birds (Woodpeckers down) you need to be at least 1/4,000 sec to have any chance of freezing the motion – unless you want a bit of movement in the wings to create a feeling of motion in which case try 1/3,000 sec.
Aperture:
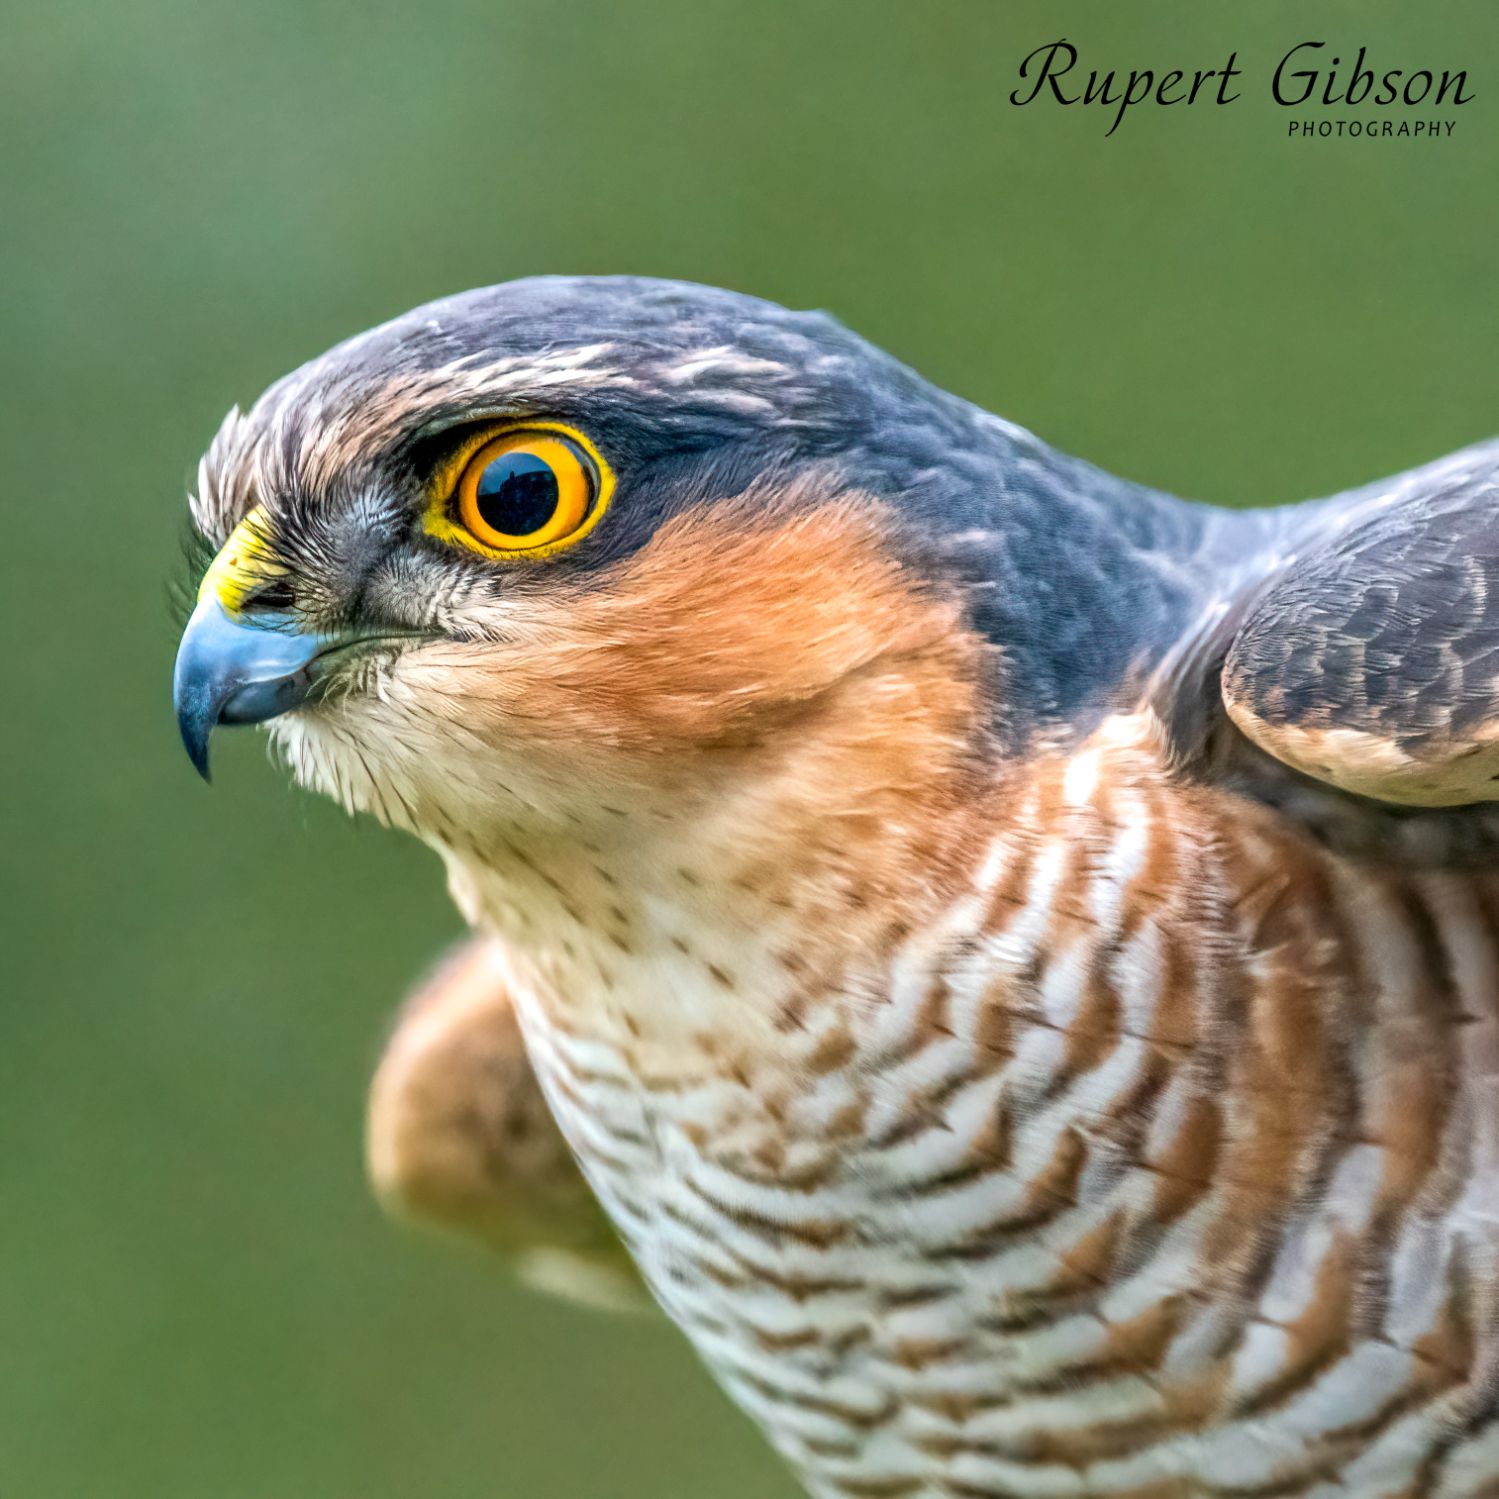
I set the aperture I need to control the amount of the subject I want in focus. I try and keep my aperture for small birds that are close to the camera to about f8/f11 (to get as much of the bird in focus as possible), the further you are away then the more of it will be in focus so that helps – but it’s harder to fill the frame and therefore get a high quality enlargement. For larger birds that are a reasonable distance away then I will be happy setting my aperture to be as wide open as the lens will go (E.g: f4 on a Nikon 600mm). I always try to make sure that the bird’s eye/s are in focus. I think an image will work well if the other parts are a bit out of focus but not having the eye crystal sharp often makes the image unusable.
ISO:
In an ideal world (seldom is) I would like my ISO to not be higher than 1,000 to keep the noise (similar to grain in film) to a minimum, if I manage to get it down to 400 then I am happy. But when shooting Owls at dusk you want to keep you shutter speed to higher than 1/1,500 to freeze the action, and have an aperture of f5.6 or f6.3 (to try and keep wing tip to wing tip in sharp focus) you will often end up with an ISO of up to 4,000 or perhaps even higher because there is no choice. If the bird fills the viewfinder whilst you are taking the picture the chances are you will still have a very useable image – but if you have to heavily crop the image then the noise will be far too high and render the image as ‘interesting’ at best.
Exposure Settings:
My ‘go to’ settings, so I can react as quickly as possible if a bird moves/the background changes is to set my shutter speed to suit the subject and its movement, set the aperture to get the right amount in focus whilst being as wide open as possible to let as much light on the camera sensor (so as to be able to keep the ISO as low as possible). This is achieved by the auto ISO setting (almost all cameras now have this feature). The camera alters the ISO between the minimum and maximum ISO parameters you have set and combined with your set shutter speed and set aperture the camera will work out the rest and try to produce an evenly balance/exposed shot. I set my camera to either matrix metering (ie: an average of the whole scene) or the central portion. This is far from fool proof – so I always take a few test shots to see if they need tweaking.
Exposure Compensation:
Where this doesn’t work so well is for subjects that have a lot of light/white feathers or fur/hair or if they are very dark. Another issue that can trick your camera exposure is when your subject has a bright or dark background behind it. But the fix is pretty simple - exposure compensation. All cameras have a way of changing the exposure up or down (without you changing the shutter speed, aperture or ISO manually).
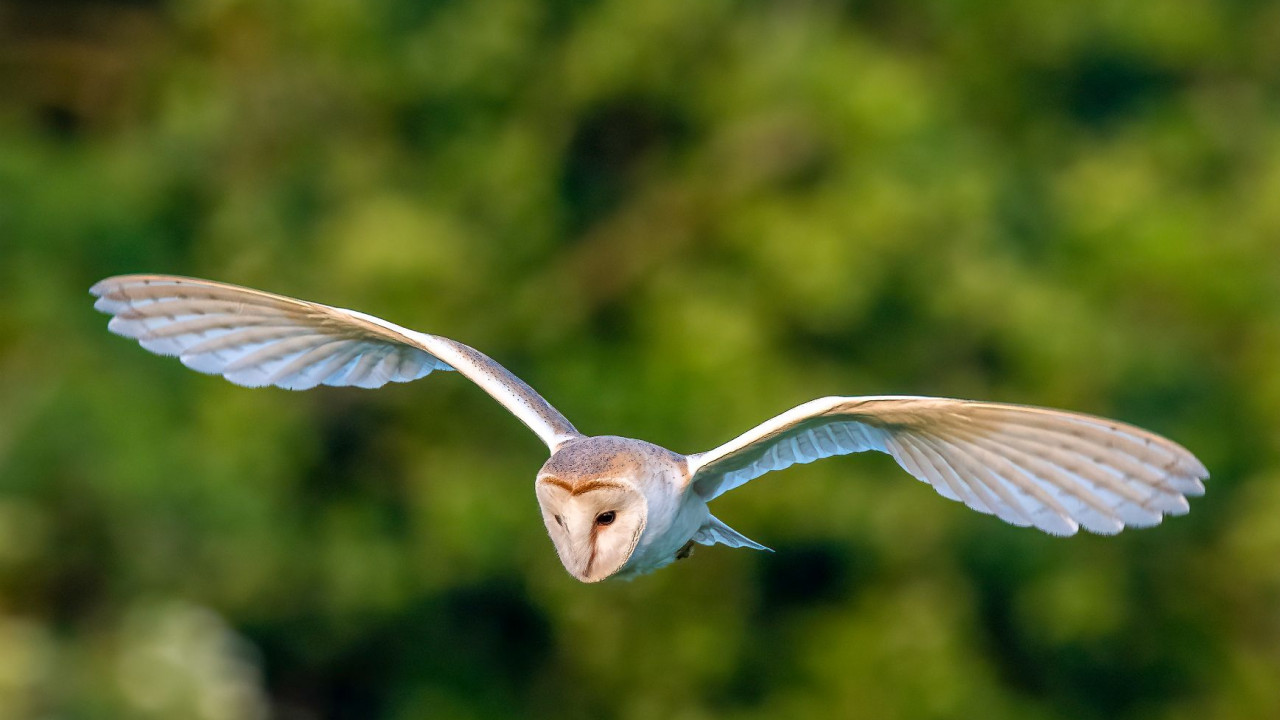
Example (Top image of Barn Owl): A Barn Owl at daybreak in sunshine but with a dark background. If you let your camera do this on its own, the Owl will be completely blown out (highlights effectively pure white and unrecoverable with editing software) so experiment with reducing the exposure by around -1.7 to -2.0 stops. See what effect that has an adjust accordingly.
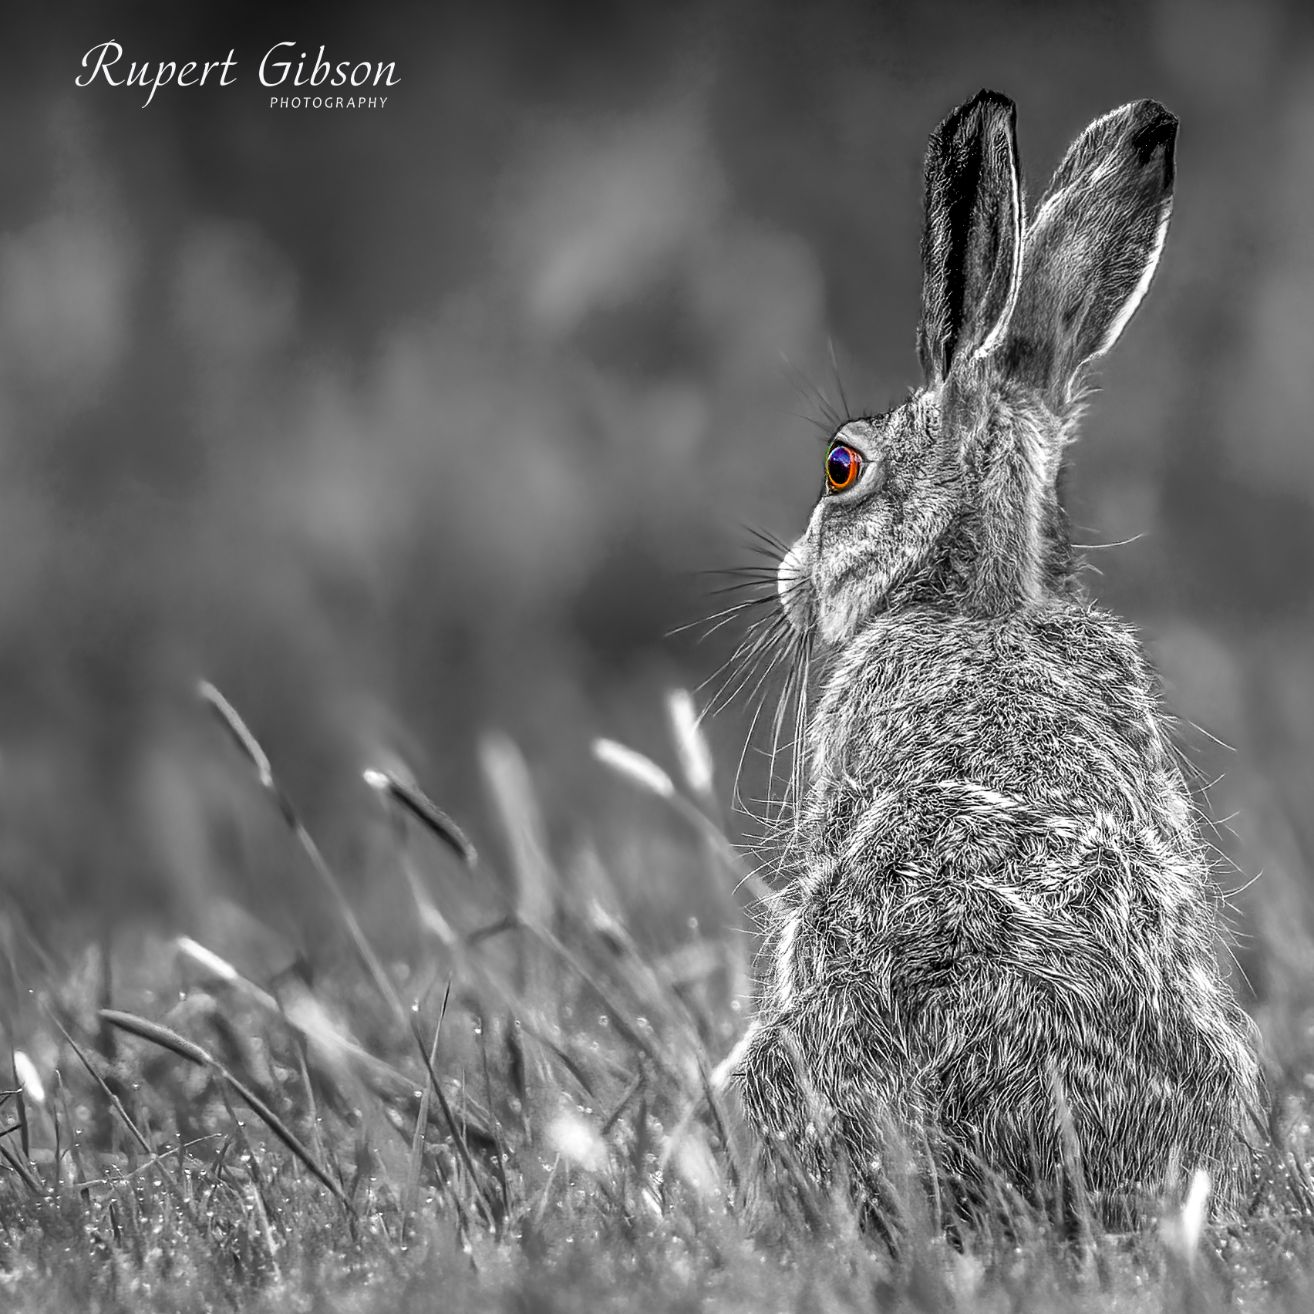
Example (B&W Brown Hare image above): If you are taking an image of a Brown Hare in the grass then you probably won’t need any exposure compensation at all – the camera’s interpretation should be close enough and produce a good, balanced exposure – but still take a test shot to be sure.
It is worth searching for ‘understanding histograms’ on the internet as this is a very good way to get your exposure correct.
The Subjects:
I would recommend starting at a zoo, inner-city park/lakes* and village ponds* – these are usually teaming with life that readily accepts people, so you should be able to get close enough to them without too much trouble. These are also great places to practice your camera settings, distance to subject, field of view, depth of field, auto-focus settings, selecting natural-looking backgrounds, stalking your subjects etc) and once you have got the best from these locations it’s time to find more challenging targets!.
*NB: I would recommend shooting birds on the water from as low down as you can get, this seems to produce a much more natural and impactful image.
It is very easy to set up a feeding station in your garden – select a location where you can get close to your chosen camera location/hide. This could be a shed, a suitable window from your house, a tent/photo hide (easily available on Amazon etc). Work out what time of day you are most likely to be able to do your photography and set up the feeding station with the sun behind you. Add plenty of natural looking perches in the feeding area with a neutral background (hedge etc) if possible – try and keep a bit of distance between the perches and the background so it is much easier to throw the background out of focus. In a few days you will be amazed at the variety of birds that will start to appear.
For wild birds and animals in their natural location it starts to get a bit more complicated. Most of them have superb vision and most animals also have an amazing sense of smell. When walking about normally they don’t seem quite so wary of people, but it often seems that the moment you start creeping about with a camera they can get very suspicious! Try not approaching the subject directly, slow down, keep as quiet as you can and don’t make any sudden movements. Another option is to find a good location and wait, once you are not perceived as a threat, they will relax a little and usually start coming closer to you. Also try not to look directly at them and this is taken as threatening behaviour as you are now acting like a predator. Oh, and switch your phone off!

Clothing and camouflage make a huge different, you don’t necessarily need to look like a sniper but don’t wear bright clothing and try to blend in with the environment as much as possible. But if you have a camouflage jacket or a small portable hide then these will certainly help. I always wear a hat (no hair so too much skin showing!) and on my left hand I usually wear a thin glove – birds seem to react when your hand moves to the lens as they see a sudden flash of movement and they vanish.
The sound of mechanic shutter rattling off 20/30 shots in a few seconds does sound a bit like a machine gun. So, the noise of the camera shutter can be an issue, perhaps firing off a few shots at a distance will get the subject used to the noise it makes. If you have an electronic shutter (which are silent) then it’s often worth using this option. Mirrorless cameras are an excellent choice for wildlife photography, Canon, Nikon and Sony all make them.
I usually take a test shot, have a quick look at the image and histogram on the back of the camera (with most mirrorless cameras you can do this in the viewfinder), make any adjustments necessary and then will shoot as needed to get the shot I am looking for. It is worth taking a fair few images as it costs nothing and as often happens, the one shot you think you’ve nailed in the field and looks great on the back of the camera, has something distracting in it when you get home and look at it on a computer screen. E.g: the bird has an eye half shut! So, take plenty of shots!

This image of a Brown Hare was taken in almost darkness using a mirrorless Sony Camera, it was then processed through Adobe Lightroom and Topaz De-noise. So, if in doubt take the picture, it might just work! - Rupert Gibson
Post-Shoot Processing:
All your images will need some degree of post-processing. There are numerous software applications available for photo editing (RAW) camera images, some are free and others require a subscription. This tech rapidly evolves and even re-processing images taken a couple of years ago can be brought back to life with surprising results! Even noisy (high ISO etc) can now be quite effectively cleaned up and made very usable.
Usually the best images require the least amount of processing, so get as much of it done in camera as possible by having nailed the exposure triangle. But thankfully you can hugely improve an image by bringing up the shadows, taking down the highlights etc.
Every image you see anywhere is processed to some degree, either by the camera and its settings and then further by post-processing on computer. That is why shooting RAW and not jpeg with your camera (shooting RAW retains the most digital information) is so important – you have more information to work with through which ever software you decide to use.
A huge thank you to Rupert for writing and sharing this fantastic guide to photography! If you would like to get in touch with Rupert to ask about anything in more detail, please don't hesitate to get in touch with us directly.
You can see more of Rupert's work and explore his website through the link below:
Rupert Gibson
View profileNever miss a notebook entry with our newsletter